
Red Velvet Thumbprint Cookies with Cream Cheese Filling Recipe
Introduction
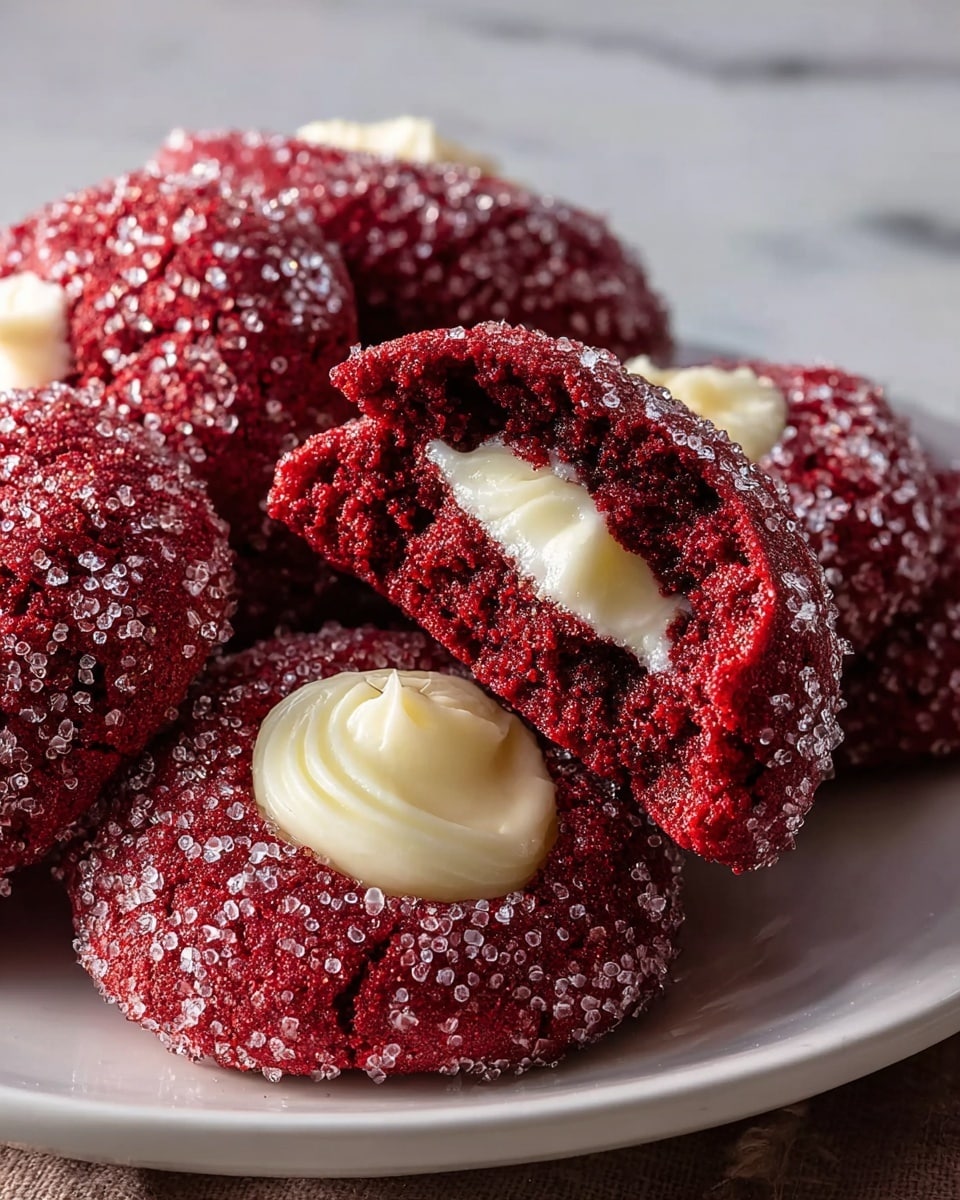
Red Velvet Thumbprint Cookies are a delightful twist on the classic thumbprint cookie, featuring a vibrant red dough with a rich cream cheese filling. These festive treats are perfect for holidays or any time you want a pop of color and flavor in your cookie jar.
Ingredients
- 2 and 1/4 cups all purpose flour
- 1/4 cup unsweetened cocoa powder
- 1 teaspoon baking soda
- 1/2 teaspoon salt
- 1 cup unsalted butter, softened
- 1 and 1/2 cups granulated sugar
- 2 large eggs, at room temperature
- 1 teaspoon vanilla extract
- 2 tablespoons red food coloring
- 1/2 cup buttermilk
- 1/2 cup granulated sugar (for rolling)
- 8 ounces cream cheese, softened (for filling)
- 1/2 cup unsalted butter, softened (for filling)
- 4 cups powdered sugar, sifted (for filling)
- 1 teaspoon vanilla extract (for filling)
Instructions
- Step 1: In a medium bowl, whisk together the flour, cocoa powder, baking soda, and salt. Set aside.
- Step 2: In a large bowl, cream together the softened butter and 1 and 1/2 cups granulated sugar until light and fluffy, about 2 to 3 minutes.
- Step 3: Beat in the eggs one at a time, mixing well after each addition. Stir in the vanilla extract and red food coloring until the mixture is vibrantly red.
- Step 4: Alternately add the dry ingredients and buttermilk to the wet mixture, starting and ending with the dry ingredients. Mix on low speed until just combined. Avoid overmixing to prevent dry cookies. Cover and refrigerate the dough for at least 30 minutes, up to 2 hours.
- Step 5: Preheat oven to 375°F (190°C). Line baking sheets with parchment paper. Place the 1/2 cup granulated sugar in a shallow dish for rolling.
- Step 6: Scoop rounded tablespoons of dough and roll into smooth balls. Roll each ball generously in granulated sugar to coat. Place balls 2 inches apart on baking sheets.
- Step 7: Use your thumb or back of a small spoon to gently make an indent in the center of each ball, being careful not to press through.
- Step 8: Bake for 8 to 10 minutes until edges are set and lightly browned, centers still soft. Avoid overbaking to keep cookies moist. Let cookies cool completely on a wire rack.
- Step 9: For the filling, beat softened cream cheese and butter until smooth. Gradually add powdered sugar, one cup at a time, beating until fluffy. Stir in vanilla extract.
- Step 10: Spoon or pipe the cream cheese filling into each cookie’s indent once fully cooled. Serve immediately or store in an airtight container in the refrigerator.
Tips & Variations
- Chilling the dough is essential to prevent the cookies from spreading too much while baking.
- Use gel food coloring for a more vibrant red without altering dough consistency.
- Try adding a pinch of cinnamon or espresso powder to the dry ingredients for a subtle flavor twist.
- Swap the cream cheese filling for chocolate ganache or your favorite jam for variation.
Storage
Store the cookies in an airtight container in the refrigerator for up to one week. Allow them to come to room temperature before serving for the best texture. The cream cheese filling can be stiff when cold, so piping or spooning it straight from the fridge is easier if the cookies are well chilled.
How to Serve

Serve this delicious recipe with your favorite sides.
FAQs
Can I make the dough ahead of time?
Yes, you can prepare the dough and refrigerate it for up to 2 days before baking. Just keep it tightly wrapped to prevent drying out.
Can I freeze these cookies?
Yes, you can freeze baked cookies without filling in an airtight container for up to 3 months. Thaw fully before filling with cream cheese and serving.
Print
Red Velvet Thumbprint Cookies with Cream Cheese Filling Recipe
- Total Time: 1 hour
- Yield: Approximately 24 cookies 1x
Description
Delight in these classic Red Velvet Thumbprint Cookies, featuring a soft, cocoa-infused red velvet cookie base rolled in sugar and filled with a smooth, creamy vanilla cream cheese frosting. Perfectly balanced with a tender crumb and a luscious filling, these cookies are a festive treat for any occasion.
Ingredients
For the Cookies:
- 2 and 1/4 cups all purpose flour
- 1/4 cup unsweetened cocoa powder
- 1 teaspoon baking soda
- 1/2 teaspoon salt
- 1 cup unsalted butter, softened
- 1 and 1/2 cups granulated sugar
- 2 large eggs, at room temperature
- 1 teaspoon vanilla extract
- 2 tablespoons red food coloring
- 1/2 cup buttermilk
- 1/2 cup granulated sugar (for rolling)
For the Cream Cheese Filling:
- 8 ounces cream cheese, softened
- 1/2 cup unsalted butter, softened
- 4 cups powdered sugar, sifted
- 1 teaspoon vanilla extract
Instructions
- Mix dry ingredients: In a medium bowl, whisk together the flour, cocoa powder, baking soda, and salt. Set aside to be incorporated later in the dough.
- Cream butter and sugar: In a large bowl, cream together the softened butter and 1 and 1/2 cups granulated sugar until light and fluffy, approximately 2 to 3 minutes using a mixer on medium speed.
- Add eggs, vanilla, and coloring: Beat in the eggs one at a time, ensuring each is fully mixed before adding the next. Stir in vanilla extract and red food coloring until the mixture is evenly and vibrantly red.
- Combine wet and dry ingredients: Alternately add the dry flour mixture and buttermilk to the wet ingredients, starting and ending with the dry. Mix on low speed until just combined to avoid overmixing, which can cause dry cookies. Cover the dough and refrigerate for at least 30 minutes, up to 2 hours, to firm up the dough for easy handling and prevent spreading in the oven.
- Prepare to bake: Preheat your oven to 375°F (190°C). Line baking sheets with parchment paper. Place the additional 1/2 cup granulated sugar in a shallow dish for rolling the dough balls.
- Shape cookies: Scoop rounded tablespoons of dough and roll into smooth balls. Roll each ball thoroughly in granulated sugar to coat completely. Arrange the balls on prepared baking sheets about 2 inches apart.
- Create thumbprints: Using your thumb or the back of a small spoon, gently press an indent into the center of each dough ball without pressing through the bottom.
- Bake cookies: Bake for 8 to 10 minutes until the edges are set and lightly browned but the centers remain slightly soft. Remove from the oven and allow to cool completely on wire racks; this ensures the cookies hold their shape and texture.
- Prepare cream cheese filling: In a medium bowl, beat together the softened cream cheese and butter until smooth and creamy. Gradually add the sifted powdered sugar, a cup at a time, beating well after each addition until fluffy. Stir in vanilla extract for flavor.
- Fill the cookies: Once the cookies are cooled, spoon or pipe the cream cheese filling into each cookie’s indent. Serve immediately or store in an airtight container in the refrigerator to maintain freshness.
Notes
- Chilling the dough is essential for firm cookies that don’t spread too much while baking.
- Do not overbake; exact baking time is key to achieve soft-centered cookies.
- Using room temperature eggs and butter ensures a smooth batter and even texture.
- The cream cheese filling can be piped with a pastry bag for a neater presentation.
- Store cookies in an airtight container in the refrigerator to keep the cream cheese filling fresh.
- Prep Time: 20 minutes
- Cook Time: 10 minutes
- Category: Dessert
- Method: Baking
- Cuisine: American
Keywords: Red Velvet Thumbprint Cookies, Red Velvet Cookies, Cream Cheese Filling, Holiday Cookies, Cake Mix Cookies


