
Reese’s Peanut Butter Cup Poke Cake Recipe
Introduction
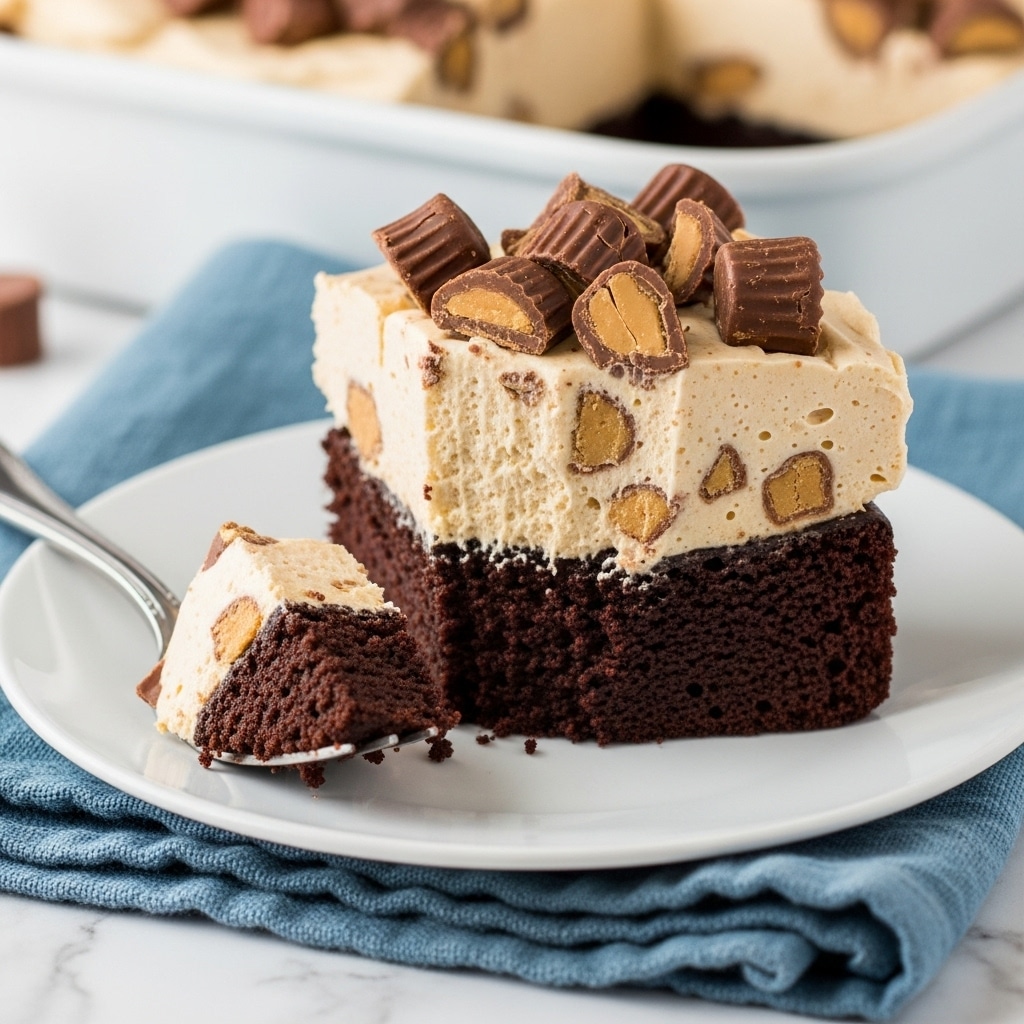
This Reese’s Peanut Butter Cup Poke Cake is a rich and indulgent dessert perfect for peanut butter and chocolate lovers. Moist chocolate cake is infused with creamy peanut butter pudding, topped with a smooth chocolate frosting, and finished with whipped peanut butter topping and chopped mini peanut butter cups. It’s a crowd-pleaser for any occasion.
Ingredients
- 15.25 oz chocolate cake mix (plus ingredients to prepare the cake)
- 3.4 oz vanilla instant pudding mix
- 2 cups cold milk
- 1 1/2 cups creamy peanut butter (divided)
- 16 oz chocolate frosting
- 8 oz whipped topping (thawed)
- 25 mini Peanut Butter Cups (unwrapped and roughly chopped)
Instructions
- Step 1: Prepare and bake the chocolate cake according to the package instructions in a 13 x 9-inch cake pan. Allow it to cool for 15-20 minutes.
- Step 2: Use the round end of a wooden spoon to poke holes in the cake every 1/2 to 1 inch.
- Step 3: In a medium bowl, whisk together the vanilla pudding mix and cold milk for 2 minutes until dissolved.
- Step 4: Divide the peanut butter by setting aside 1 cup. Whisk the remaining 1/2 cup into the pudding mixture until smooth.
- Step 5: Pour the pudding mixture over the cake, making sure to fill the holes as much as possible.
- Step 6: Microwave the chocolate frosting for 15-20 seconds until pourable, then drizzle evenly over the cake and spread with the back of a spoon or offset spatula.
- Step 7: Let the cake cool completely.
- Step 8: In a large bowl, whisk together the reserved 1 cup peanut butter and whipped topping. Spread this mixture over the cooled cake.
- Step 9: Sprinkle the chopped mini Peanut Butter Cups evenly over the top of the cake.
- Step 10: Refrigerate the cake for at least 4 hours before serving to let the flavors meld and the pudding set.
Tips & Variations
- Use fresh whipped topping for the best texture, and make sure it’s fully thawed before mixing.
- For a richer peanut butter flavor, consider adding a few tablespoons of peanut butter to the chocolate frosting before melting.
- Swap mini Peanut Butter Cups for chopped Reese’s bars or peanut butter chips if you prefer.
- Allowing the cake to refrigerate overnight enhances the flavors and texture.
Storage
Store this cake covered in the refrigerator for up to 3 days. When ready to serve, slice and enjoy cold or let it sit at room temperature for about 10 minutes for a softer texture. Avoid freezing, as the whipped peanut butter topping may separate when thawed.
How to Serve

Serve this delicious recipe with your favorite sides.
FAQs
Can I use homemade chocolate cake instead of a cake mix?
Yes, you can use your favorite homemade chocolate cake recipe. Just be sure to bake it in a 13 x 9-inch pan and let it cool before poking holes and adding the pudding mixture.
What if I don’t have mini Peanut Butter Cups?
You can substitute with chopped regular-sized peanut butter cups, peanut butter chips, or even chopped peanuts for a similar flavor and crunch.
Print
Reese’s Peanut Butter Cup Poke Cake Recipe
- Total Time: 4 hours 50 minutes
- Yield: 12 servings 1x
Description
This Reese’s Peanut Butter Cup Poke Cake is a decadent and creamy dessert combining rich chocolate cake with peanut butter infused vanilla pudding. Poked holes in the cake absorb a luscious peanut butter pudding mixture, topped with melted chocolate frosting and a fluffy peanut butter whipped topping, finished with chopped mini Peanut Butter Cups for a perfect blend of flavors and textures. It’s refrigerated for a set, moist, and indulgent treat ideal for parties and family gatherings.
Ingredients
Chocolate Cake
- 15.25 oz chocolate cake mix (plus ingredients required to prepare the cake as per package instructions)
Pudding and Poke Filling
- 3.4 oz vanilla instant pudding mix
- 2 cups cold milk
- 1 1/2 cups creamy peanut butter, divided (1/2 cup for pudding, 1 cup for topping)
Topping
- 16 oz chocolate frosting
- 8 oz whipped topping, thawed
- 25 mini Peanut Butter Cups, unwrapped and roughly chopped
Instructions
- Prepare the Cake: Prepare and bake the 15.25 oz chocolate cake mix according to the package directions using a 13 x 9-inch cake pan. Once baked, allow the cake to cool for 15-20 minutes.
- Poke Holes: Using the round end of a wooden spoon, poke holes in the warm cake spaced every 1/2 to 1 inch to help the pudding mixture soak in thoroughly.
- Make Pudding Mixture: In a medium bowl, whisk the vanilla instant pudding mix with 2 cups cold milk briskly for 2 minutes until dissolved. Stir in 1/2 cup creamy peanut butter until smooth and well combined.
- Fill Cake Poke Holes: Pour the peanut butter pudding mixture evenly over the cake, making sure to fill all the poke holes to infuse flavor and moisture.
- Chocolate Frosting Layer: Microwave the chocolate frosting in a microwave-safe bowl for 15-20 seconds until slightly melted and pourable. Drizzle and spread the frosting evenly over the pudding-soaked cake using the back of a spoon or offset spatula.
- Cool the Cake: Allow the cake to cool completely at room temperature for the frosting to set slightly before proceeding.
- Prepare Peanut Butter Whipped Topping: In a large bowl, whisk together the remaining 1 cup of creamy peanut butter and the thawed whipped topping until fluffy and combined.
- Spread Topping: Spread the peanut butter whipped topping evenly over the cooled chocolate frosted cake layer.
- Add Peanut Butter Cups: Sprinkle the chopped mini Peanut Butter Cups evenly over the peanut butter whipped topping for extra crunch and flavor.
- Chill: Refrigerate the assembled cake for at least 4 hours before serving to ensure it sets perfectly. Store leftovers covered in the refrigerator.
Notes
- Use a 13 x 9-inch cake pan for best results.
- Ensure the cake is warm when poking holes to help the pudding mixture soak in properly.
- Microwaving the frosting makes it easier to drizzle and spread evenly over the cake.
- For best flavor, refrigerate the cake for at least 4 hours to let the layers meld together.
- You can substitute whipped topping with whipped cream if preferred.
- Store the cake covered in the refrigerator for up to 3 days.
- Prep Time: 20 minutes
- Cook Time: 30 minutes
- Category: Dessert
- Method: Baking
- Cuisine: American
Keywords: Reese’s, Peanut Butter Cup, Poke Cake, Chocolate Cake, Peanut Butter Pudding, Dessert, Party Cake


